Friday, October 21, 2011

Nesting boxes, window for chicken coop

The nesting boxes going up, starting as a nice bench like structure. It is really sturdy like this. I didn't want the legs to touch the ground because it would interfere with sweeping out the coop with ease.


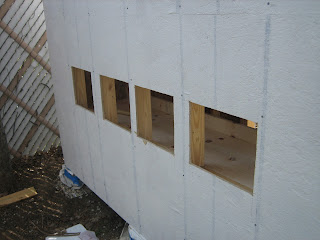
Here are the nesting box doors cut out of the siding.

Siding, roof, and windows for chicken coop

This was the cheapest particle board siding we could get. I just cut pieces in the most efficient way so that they would line up on studs and had proper holes for windows and doors and things and nailed them in. After cutting it without a mask, I was sick for a day or two from whatever glue got kicked up that holds the boards together. It was something like $10 for an 4X8 sheet, so it had to be not great in some way. I made sure to paint and seal the edges so I wouldn't have to worry about rotting too soon. 


The roof is just 4 strips of corrugated aluminum sheets with flashing added to make sure the edges didn't leak. Because I didn't have any convenient way to cut aluminum sheets cleanly, I designed the roof after having seen what sizes I could buy at Home Depot. Luckily what they had worked with my design, and I only had to overlap a wave or two and it all fit. I screwed it on with special screws that have a rubber washer that prevents moisture from seeping through the screw holes.

First window I have ever hung. It is a cheap $20 window from Home Depot, but it ended up being useful  for hanging a fan outside of and helping the chickens cool down in the summer. We have a thermometer in the coop to make sure that it doesn't get too hot for the chickens. I think I installed it backwards so we could open it from the outside. I'm not sure if I put it in right, I just shimmed it till it was level and screwed it in. 

I decided to add this clerestory because it looked good and would provide ventilation. I just stapled window screening up to it, and left it like that. I will put up some sort of cover for when it gets too cold.

roof framing for chicken coop

The roof was the most challenging part because I had never done it and had to do a lot of research to properly cut the notches to get the slope of the the roof right. I finally got it though. I set up the pieces on my driveway to reproduce what it would like on the chicken coop, while being able to work on it without climbing a ladder. So from there I took a framing ruler (which is an L-shaped ruler with measurements on it) and figured out how to calculate the angle of the notches from the angle of the slope of the roof which was based on the rise over run thing, and then after getting it promptly forgot how to do it. But not before I cut 5 rafters.


You can see I have stapled window screening to the clerestory area. I added that area because I had to add something in there to make the framing easier, and because it looks neat and because it allowed for convenient way to ventilate from the front to the back window. I intended to make a cover for it, either a boarded door that swung down and covered it or a canvas cover, but it hasn't gotten cold enough for it to be necessary, so it is just window screening.


I think I cut these out with a jig-saw. I borrowed a table saw for this project, already had a miter/chop saw and made a lot of use of a handheld jigsaw whose blade would bend constantly and ruin cuts. I worked with it carefully. It was really useful when I had to cut out holes in siding later.

Chicken coop walls, going up

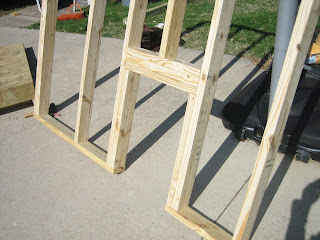
To lower costs I used a medium grade lumber that was bowed slightly in places and the walls were difficult to get perfectly square, but with enough adjusting we got it really close. By measuring the two sets of opposite corners I think you can tell if it is square. I hope so. That is what I did and they were within an inch of each other.


Chicks

We got 12 chicks of varying breeds that I can't remember right now. 

Walls, separate

These are the four wall sections. I took the sketchup file and just separated the walls  and took all my measurements from that, it worked great because it was all planned out before hand. The framing is the only thing I really thought through on this project, everything else was trying to accomplish a basic functionality and look while making it up as I went along. I turned to the internet for most all of the research, especially for learning basics of framing and roofing. I think that for these walls I used those heavy duty ratcheting straps to hold the basic frame together while I nailed everything in place. That helped as I moved around to make sure everything was square. I think the main thing I focused on was getting correct measurements and making sure everything was square, because then at least the basic structure would be sound and a solid foundation.


Thursday, October 20, 2011

Chicken coop foundation

Here's the first idea I put together for the coop in sketchup, not really worrying about anything except roughing out a basic feel, and using a 4x8' footprint to make construction easier.
Here is the revision I used to calculate and get measurements for the framing lumber and construction I would use. I got most of the spacing and configurations off of diagrams and sites online. I did this for most of the coop, as I have never built any structure like this before. It was a first time for everything I did I think.


Here is the foundation complete. It consists of cinderblocks buried to beneath the frost line in holes filled with gravel. I leveled off the cinder blocks with a 2x4 and a level to make sure they all sat on a plane. The 4x8 plywood sits on a treated lumber frame, and the underside of the whole structure is painted to prevent moisture and insects from destroying it. There is one cinder block in the center of the whole thing.